Installing penguins-eggs filesystem.squashfs directly to usb drive by-passing iso file booting.
 Summary of bash script here:


ws filesys btn
 Opens a file window so you can browse to and select a filesystem.squashfs file and this will will be written to your custom WIDEshell USB.
eggs filesys btn  Sets eggs nest as filesystem source: /home/eggs/.mnt/iso/live/filesystem.squashfs
usb drives btn

 Opens new program window that lists all mounted partitions. Gparted button to launch gparted manually.

Buttons for /dev/sdb through /dev/sdg drives that will build your custom WIDEshell USB.

grub info btn  Opens new display window that lists information about grub configuration and documentation.
requirements btn  Opens new display window stating the WIDEshell program requirements.
about btn  Opens new display window with information about  WIDEshell, penguins-eggs, 


WIDEshell Dependicies - Installing yad gui

yad not installed200


 The WIDEshell User Interface requires the following programs:

  • yad 10+
  • penguins-eggs 9.6.14+
  • gnome-terminal


yad gui 

yad must be installed as it is a key part of the WIDEshell User Interface:

yad must be compiled on the computer as it is cpu process dependent.

yad has mutliple options for compiling:

  • yad base 
  • yad html
  • yad html + sourceview


Installing yad:

Download yad source

yad gui source repository on Github:  Download Here

Install yad dependicies:


Compiling tools: 

sudo apt-get install automake build-essential intltool


webkit3 (if you compile yad with option --enable-html): 

sudo apt-get install libwebkit2gtk-4.0 libwebkit2gtk-4.0-dev


media playing:  

gstreamer1.0-libav gstreamer1.0-plugins-good gstreamer1.0-plugins-bad


sourceview3 (if you compile yad with option --enable-html): 

sudo apt-get install libgtksourceview-3.0-1 libgtksourceview-3.0-common libgtksourceview-3.0-devsudo


Compile yadsource (as root):

sudo -s-
autoreconf -ivf && intltoolize

./configure --enable-html --enable-sourceview
make
make install
exit


Update gtk icon cache

Manually run gtk-update-icon-cache after yad installation.
 
gtk-update-icon-cache


yad installed200


Duplicate yad binary (for special use by WIDEshell User Interface)

cd /usr/local/bin
sudo -s
cp ./yad ./ya2
cp ./yad ./yad3
cp ./yad ./yad4
cp ./yad ./yad5


DONE ! 


Installing penguins-eggs

eggs not installed200


 The WIDEshell User Interface requires the following programs:

  • yad 10+
  • penguins-eggs 9.6.14+
  • gnome-terminal


penguins-eggs

penguins-eggs is by far the best and easiest Linux Remastering console tool available for our Debian builds of Linux Mint Debian Edition 6 and Q4OS Linux 5 Trinity Desktop version. We use penguins-eggs to make a live versions of our WIDEshell User Interface. penguins-eggs also serves to backup our custom Debian Linux  Builds for easy reinstallation if needed.


Installing penguins-eggs:

  • Download current penguins-eggs deb file
  • Execute: penguuins-eggs deb file: sudo dpkg -i ./eggs_9.6.20_amd64.deb
  • Dependicies: install them, using apt: sudo apt --fix-broken install
  • Configure: sudo eggs config
  • Set iso parameters: sudo eggs dad
  • Produce egg clone max compression: sudo eggs producec --clone --max
  • Write your custom eggs Live iso to usb drive:
    • sudo dd if=./eggs_9.6.20_amd of=/dev/sdX bs=4MB status=progress && sync


Download penguins-eggs compiled deb installer

penguins-eggs Debian Version repository sourceforge.net:  Download Here


Install penuins-eggs - deb installer file: 

cd Downloads # or to path that hads your browser downloads. 

sudo dpkg -i ./eggs_9.6.20_amd64.deb


Install required dependicies: 

sudo apt --fix-broken install

eggs installed200


Configure eggs - new install:  

sudo eggs config # select GUI Installer when prompted | yes | yes


Set iso file settings: 

sudo eggs dad
# prefix name
# base name
# user name
# user password
# root passowrd
# compression type= max | standard


Clone Your First eggs Distro (max compression):

    • Don't use the --release option when running this command.
    • You want Calamares on the target of cusom writalbe thumb drive
sudo eggs produce --clone --max # yes


Write your_custom_eggs.iso eggs Lvie GUI Installer to usb thumb drive

sudo fdisk -l # find your device id, like /dev/sdb

# prior to eggs penguins-eggs/9.6.19

#-----------------------------------------------
cd /home/eggs/mnt

#-----------------------------------------------
# penguins-eggs/9.6.19+
cd /home/eggs/.mnt/

#-----------------------------------------------
# Write iso to thunbdrive with /dev/sdb id

sudo dd if=./eggs_9.6.20_amd64.deb of=/dev/sdb bs=4MB status=progress && sync

# You now have a bootable Line eggs Installer of your custom build.


DONE ! 


 What's next:  See  Create writable eggs usb drive


WIDEshell Dependicies - Installing gnome-terminal

gnome not installed200


 The WIDEshell User Interface requires the following programs:

  • yad 10+
  • penguins-eggs 9.6.14+
  • gnome-terminal


gnome-terminal

gnome-terminal provides a --window (new window) otption that opens:

  • bash commands
  • bash scripts 
  • terminal launches child terminal that runs a bash command or bash script.

These options are not available in other terminals.


Installing gnome-terminal:


sudo apt-get install gnome-terminal


gnome installed200

DONE ! 


WIDEshell - Create penguins-eggs writable usb drive


See: Installing penguins-eggs for creating a eggs custom Live thumb drive


Create penguins-eggs writable usb drive:

  • Thumb Drive: Need 16GB (or larger) in this example build 16GB
  • sudo fdisk -l : Identify thumb drive device id: example, /dev/sdb
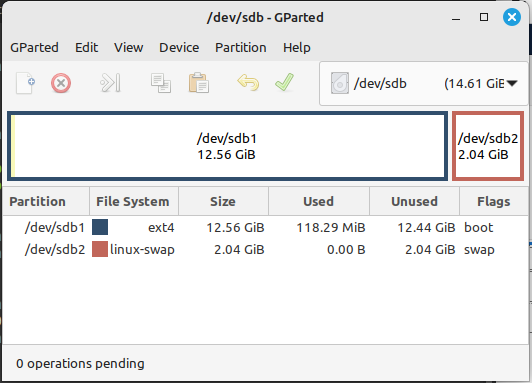
  • Gparted: create 2 partitoins: 13GB ext4 | 2GB (remaining) Linux swap-file
  • Boot your  eggs custom Live thumb drive. (Installing penguins-eggs)
  • Start Calamares: Manual Partition | /dev/sdb1 | Mount Point: / | grub install:/dev/sdb


sudo fdisk -l # to id your usb drive

sudo fdisk -l 

Device Boot Start End Sectors Size Id Type /dev/sdb1 * 2048 26339327 26337280 12.6G 83 Linux /dev/sdb2 26339328 30627839 4288512 2G 82 Linux swap / Solaris


  • Gparted: to partiton your usb thumb drive:
    • part1 - ext4
    • part2 - Linux swap-file
sudo gaprted /dev/sdb

 gparted parted sdb1 2


Video - how to create partitions using gparted on youtube


Boot your custom Live eggs thumb drive:

  • insert new dual partition usb in to computer
  • launch penguins-eggs Calamares Installer 
    • Open Terminal - run bash script: /usr/sbin/install-system.sh  # Leave terminal open - minimize Terminal
    • Manual Partition | /dev/sdb1 | Mount Point: /  | grub Install: /dev/sdb

DONE !